Jun 20, 2010

Happy Father's Day and The Color Room

First things first, Happy Father's Day to all the dads out there!  We had a nice day coffee and presents, then church, and then a BIG lunch with the kids and their Dad.  The kids were so well behaved and we thanked them dearly for getting along.  Even baby William was peacefully awake and quiet for the whole time we were out.

Here are a 2 cards I made for both my Dad and Mark's Dad.  It was a last minute card with 7 Gypsies tags, a retired stamp from CHF and some Webster's Pages paper.  EASY as pie!  And to make 2 identical cards is the way to go.


And here is my first layout for The Color Room challenge NING site.  I used their Palette #11 and sketch for the following layout IMAGINE - PLAY.


I had some fun with layering on this layout, and USING UP OLD STASH.  I am really enjoying participating in color challenges because of the methodology of putting a layout together.  I go around my craft room just pulling colors out - doesn't matter what it is, then I somehow make it work on the page.

I brought the word imagine a while back at Michael's and finally found the perfect picture for it!  I treated it with pink paint, then applied stickles, then because I didn't like the result, I applied Dazzling Diamonds glitter by Stampin' Up!


I thought I would take a picture showing all the layers here....we've got Queen & Co felt, circles of paper, a die cut paper layout, a strip of lace paper, and a chipboard tree from Basic Grey, flowers, and the chipboard imagine.


I printed out my journaling onto photo paper and hand cut all the letters and pieced them back together on the paper.


A little while back, I won some Unity stamps, so here they are in use (the circles and the EVERYDAY LIFE sentiment).  That cute crown is a brad from the Paper Studio.  The letters are My Mind's Eye, the brackets are Basic Grey, and the film strip is an old rub-on from Daisy d's.  And there is some paint there too.


If you like the color palette and can play along with The Color Room, you have until June 25th to upload to the gallery.

Bye for now!

Jun 18, 2010

Color Combos Galore - ME - FEATURED - How About That?

I am excited to share with you the newest Color Combo #147 from Color Combos Galore, a challenge NING site that has a very talented design team and members!  I was asked if I could create a layout for this week's color challenge as a featured member.  OF COURSE I would!  I would never turn down a challenge and a chance to be in the spotlight.

So here is the color combo with a designer challenge:


And here is my take on my daughter's art & table:


A while back, I won a February 2010 kit from Up the Street Scrapbooking, and this layout was made with the kit papers and embellishments - lots of yummy Basic Grey and Maya Road.  This shipping tag tucks into the envelope nicely.  I had to trim it a bit.


I think I need more of these Maya Road envelopes!  They are quite fun to dress up and stamp!


More Maya Road flowers, Prima Leaves, K & Co Metal (imagine), Prima Letters, My Mind's Eye brad.


Have a great weekend!

Jun 15, 2010

CLAY BRADS - MAKE IT!

Just a quick note to let you know that my new CLAY BRAD tutorial is up on my other crafty blog.  Here is a sneak!

GOING SOFT

I am going soft girls!  I have been playing along at Color Combos Galore and have found the past 2 color palettes beautiful and soft.  This is Inspiration Palette #146.  Along with the color combo - there is also a challenge.  This week was to add some sort of stitching - so I added some FAUX stitching to the LOVE letters and rub-on stitches on the bottom of the layout.  I am SO sad that this paper is no longer available (Chatterbox Artsylicious Fine Lacquered Paper).  It is embossed, so you can apply paint, ink, whatever to the negative space and make the floral pattern pop.

My picture - I TRIED TO TAKE A PICTURE FROM A DIFFERENT PERSPECTIVE.  I love seeing these artistic pictures that I see other gals playing with, so I finally jumped in and had my daughter pose for pictures from the knees down.  She could not understand why I was doing this, and continued to make sure she was smiling - ADORABLE!  I played with photoshop actions to make the image POP and I used the dodge tool to lighten up her legs that were covered in bruises.  It worked like a charm!


Here is a shot of the new Pink Paislee frames that I got from my Up The Street Scrapbooking kit this month.  I sprayed it with Glimmer Mist (takes a while to dry!).


Here is a picture of the faux stitching on the letters, which were PLAIN Kaisercraft chipboard letters that I painted cream, then lilac.


If you want to play with this color palette too, go check out Color Combos Galore - you have until tomorrow to play, and of course, you can always just use the colors whenever you want.

Jun 13, 2010

Cute as a Cupcake - Candy Shoppe Designs Challenge - FREE GSD FILE

Candy Shoppe Designs has a PAPER CUPCAKE challenge going on right now, until tomorrow June 14th.  There is a paper cupcake making tutorial that you can watch and then make your own, however you want!  I chose to create a canvas piece of art for my daughter, therefore a FLAT paper cupcake.  BEST part is, this is a $2.00 canvas turned into a piece of art!

The winning entry will receive a kit from Color Me Miki (see blog candy below).


Here is my take on the challenge, using Turquoise and Garden Fairy Glimmer Mists for the background, my Cornish Heritage Farms Vintage Text Scrapblock (6x6 STAMP).  The paper is the new black and white line from My Mind's Eye.  I designed the title in Photoshop and used my Silhouette machine to cut them out.  If you want a FREE GSD FILE that says "cute as a cupcake", you can download it HERE.


I had some of this sheer material so I thought I would use it for icing, twisting in some We R Memory Keepers trim.  The ink I used is CHALK INK - Chestnut Brown for all the stamping and edging.


After I cut the title in black cardstock, I applied RANGER GLOSSY ACCENTS for a nice shine!


Again, I used my trusty Silhouette to cut the circles, then painted them with a RANGER dauber.


One of my favourite products lately is Maya Road's velvet ric rac ribbon (that nice rosy coloured one).  The crochet ribbon is PRIMA.

If you have time, try making your own cupcake creation for the CANDY!

Jun 12, 2010

Meeting Up With Scrappy Friends!

I think it is quite a blessing to be able to meet people on-line through this paper crafting world, and be able to meet in person from time to time and there is no awkwardness.

I was able to meet up with the ever talented Sherrie Siemens (below), who came to my hometown of Burlington to teach some Copic classes and Copic certification.  Sherrie and I had worked together for Cornish Heritage Farms.  And Jen, had also worked with us at CHF and she and I get together all the time to hang out and scrap.  As it happened, Sherrie happened to be meeting up with Kerry from Cards by Kerry who I never knew before last night and found that she lives in Burlington too!  I am always happy to meet a new local scrappy friend!  We had such a great time, lots of laughs and really really good conversation.


And for some CRAFTS, the ladies had noticed that I was wearing a necklace, and had asked if I made it!  This is it (above), I had made it for a Bead Trends call, but it never got picked up, so I decided to wear it...which is unusual for me.  I make jewelry, but don't actually wear it.  What's with that? 

Enjoy your Saturday!

Jun 10, 2010

Variated Petals - Playing with WHITE Flowers!

I just posted a QUICK tutorial on my other blog in case you're interested!  To alter this flower, it took me all of 5 minutes.


Happy Crafting!

His Story

Thanks to Tara at Up The Street Scrapbooking for putting together an awesome kit for June 2010!  Here is my first layout using MOST supplied from the kit.  We have some Webster's Pages, Maya Road envie, and Glimmer Mist, Paint, and Copic Markers!  Again, I was inspired to get my colours out for the COLOR ME HAPPY challenge going on at Scrap Your Crap.  I coloured some of the paper with Copic Markers (the books at the top, and the blue dots on the ball. Paint was used for the letters and envie, and Glimmer Mist was my medium of choice for the background shadows (PATINA is my FAVE Glimmer Mist colour).


This layout has inspired me to write out all of my children's birth stories.  They love to hear about how they were born, when and what they first did.  Before I forget, I plan to write down as much as I can remember from each birth, and tuck it into layouts for them to read later in life.

PS- if you haven't bought these yet, the KAISERCRAFT plain chipboard letters are awesome!  I picked them up from Scrapbook Star and you can see that I've been using them on ALL my recent layouts.  I just paint them to suit my layouts.

Jun 9, 2010

Give Life


PICTURE PERFECT SNAP SHOT!  Here is my little guy as he is TODAY with a party hat on (this is a warning to Mothers - never leave your baby alone with a 4 year old girl for more than 3 minutes!).  Imagine my horror to come back into the room to find my little guy crying with a PRINCESS party hat on.  Did I take it off immediately, NO, like any good scrapbooker, I went to get the camera of course!

Back to the fun world of paper crafting....

I truly believe that this is the most wonderful story, and it's only the beginning.  I created this layout starting with this picture that my sister took of me right before William was born.  She had this super fan blowing in my face, I felt like a SUPERMODEL.  It was her new toy, so I just went with it.  I distressed this layout beyond recognition, and I used colour combo 145 from COLOUR COMBOS GALORE.  They have a wonderful design team there that rocked these colours.  BEAUTIFUL.

Also, at Scrap Your Crap, they have monthly challenges, and June's challenge 54 is COLOR ME HAPPY.  Using paint, pencils, etc. to add colour to your layout.  I used Patina Blue Glimmer Mist for the background and other papers, Mustard Seed Distress Ink for the background paper, Ranger Paint for the letters.  I also sprayed those original WHITE flowers from PRIMA....Some of the stuff on this layout came from Up The Street Scrapbooking Kit Club (overlay, flowers, buttons, Pink Paislee frame).  If you're looking for a kit club, you should check out Tara's kits.


Happy Crafting!

Jun 8, 2010

2 Sketches 4 You - For the Bride!

I thought I would challenge myself and try something new!  I decided to stamp CHF's Vintage Text backgrounder and draw my own image - I know - earth shattering drawing!!!  :)


It is a cute simple dress that I painted with diluted alcohol ink by Ranger (red pepper).  Stickles made a nice sash, and a tiny Prima flower tops it all off.  I love the idea of the text showing through.

This card is based on a sketch from 2 Sketches 4 You.


Happy Stamping!

May 31, 2010

ART - A Recycled Album

When I was originally putting together this album, I had no idea what the subject would be, but then it quickly came together when I started looking at all my pictures on the computer.  I was seeing all these great thumbnails of all the CREATIVE work I had accomplished in 2009.  So there you have it!  Each page is dedicated to a different type of art, and has a coordinating ARTSY quote to go with it.


The album is made from a PRIMA flower package (vines) which is nice and long and can be folded in half.  This was a great project to use up scraps and bits and pieces of embellishments.

Happy Monday!

May 28, 2010

Gettin' Messy with Distress Ink!

I read on Tim Holtz' blog that he was having a Distress Ink Contest, so I thought I would do something I've always envisioned would work well, and that is letting the water drip and drop everywhere!

If you want the full tutorial, visit my NEW tutorial blog! I am excited to have all my techniques and tutorials in one place. I'll be adding to it in the next few months, so be sure to check back!


The stamps are Technique Tuesday (Ali Edwards) and that boy is my cute son! Thanks to Julie Johnson of Vine Images (my lovely and talented sister) for the picture.

May 27, 2010

Happy Retirement Card, Penny Black

I am heading to a retirement party and wanted to make a special card for a special lady. She is quite classy, so she needed a classy card.

I used one of my favourite techniques, the 4 coat UTEE and crack technique. If you won a bottle of UTEE (Ultra Thick Embossing Enamel), you really should try this! Simply use VersaMark to adhere the crystals to the image, and heat set, repeat to achieve 4 coats. Let sit until it cools, then crack and have fun! I also take some liquid ink and try and get it into the cracks so that they stand out a bit more.

The stamp is by Penny Black, one of my only wood mounted stamps, and I love it. The sentiment, I made in Photoshop and printed it. Paper is 7 Gypsies (cream and black) and Kaisercraft (blue). I altered a light blue velvet ribbon by colouring it with a Forest Green Copic marker. The lace was sprayed with Patina Glimmer Mist by Tattered Angels.

See you around!

May 26, 2010

2 Sketches 4 You, Greeting Farm and Kaisercraft

Makes a great combination if you ask me! So, the post below, you can see the OTHER "Me Time Anya" image that comes in the set. This bathtub one is too cute and I am glad I made this purchase!

The card is based on this week's sketch at 2 Sketches 4 You, I just rotated it and played with the shape of the card. The paper is by Kaisercraft (Devonshire and Gypsy Sister Collections). The image was coloured with Copic markers, and that lovely soft blue around the edge is Tumbled Glass Distress Ink, applied with Cut n' Dry Foam, one of my favourite products and must have!

Bye for now! And play along if you can!

May 25, 2010

Me Time Anya

I just got a really cute stamp set from The Greeting Farm, called Me Time Anya. This one stamp is perfect for a gift card, with the inside sentiment being "Pamper Yourself". I pulled out my trusty dusty Copic markers for this one, and used Antique Linen Distress Ink to ink around the image with Cut n' Dry Foam. The papers are My Mind's Eye from Scrapbook Star's April kit. Beautiful paper! I am a BIG My Mind's Eye fan.

By for now!

May 21, 2010

2 Sketches 4 You and Moxie Fab World Challenges

I have little time these days, so I thought I would play along with 2 challenges and make 1 card! How efficient of me!

Over at PaperCrafts' Moxie Fab World, they have a challenge to make a card with FABRIC. I bought this Silhouette Victorian Chair die cut shape for Moxie Fab's CHAIR challenge, but never had the time to make a card. So I'm using it now. I decided to use fabric for the upholstery part of the chair. I took white FABRIC and inked it with Spun Sugar Distress Ink (a new colour by Tim Holtz/Ranger). I then took a polka dot stamp from Cornish Heritage Farms and stamped some brown dots on my FABRIC. I covered the dark brown chair with Glossy Accents and the FABRIC with some clear drying glue.

The card design is based on a sketch provided by 2 SKETCHES 4 YOU. It is sketch #52 by Laura. Have a peek and play along too with either challenge.


Supplies:
Cardstock: Bazzill
Rub-on Stitches: Daisy d's
Patterned Paper: Basic Grey Kioshi
Chair: Silhouette Die Cut
Ink: Ranger
Adhesive: Glossy Accents, Art Glitter Institute
Dies: Spellbinders
Lace: Prima
Buttons: Basic Grey
Twine: Marth Stewart

May 20, 2010

Some Cuteness Coming Your Way

Is this not the sweetest hair do EVER? Look at that curl, that one single curl! I finally got out the camera today to capture my baby's hair style for the last month. My sister wanted me to cut it off, but I say - WHY? It's so stinkin' cute!

And then, as if that weren't cute enough, throw in this little pup. He is 3 months old, and when I went to Homesense the other day, I bought this doggie sweater for Chewie. It was $12.99 and I couldn't say no. My husband HATES these kinds of things, which makes it all the more fun. I teased that I would be buying the dog some boots for the winter. Surprisingly, Mark sees the value in this! What fun is a dog if you can't dress it up! That's what I say.

And for some paper crafting goodness. I finally learned how to use my Silhouette's Print n' Cut feature, and now that I know how to do this - YOU WILL BE SEEING LOTS MORE! The Butterfly image is from House of 3, and you can purchase it from the Silhouette site. I made the outline slightly larger to cut the matte (with black cardstock). I made 9 cards in one cut, making it so easy to mass produce for swaps, etc....
The inside of the card has a fold/pocket for a gift card, and it is decorated with a strip of Basic Grey decorative tape. It's an easy way to dress up a card! The pink distressing is actually Shimmerz Paint, applied to the shaven edges with a paintbrush. The stamp is Cornish Heritage Farms.

Thanks for stopping by and sharing in the cuteness!

May 14, 2010

Amazing Love....How Can it Be?

As I was creating this layout, I knew the title would be "Amazing Love", because life and birth is amazing. The love a person can have for their own child in unconditional, beautiful, unexpected.

But I also had in my mind, this worship song called You Are My King - see previous post for the You Tube Video and to listen to it. Amazing love, how can it be? Brings tears to my eyes.

I want to thank my sister Julie Johnson for all the amazing photos she has blessed me with over the years, and she is also in the midst of writing a book called Unexpected Love - it includes many of her lovely artistic photographs as well as scripture verses that remind us of God's love, and how we can relate God's love for us, as we love our own children. Is there a greater love?

This layout is of my son William, my third, my beautiful boy. I love him so much! He is sleeping now, contently. I got messy with this layout pulling out Shimmerz Spritz and Ranger Paint Dabbers, and some other paints as well.

The paper and letters are from Kaisercraft.

Painted Letter Instructions:
  1. Paint the raw chipboard letters with BOTTLE colour paint.
  2. Apply dabs of POOL colour paint.
  3. Spray with a glossy craft coating (optional).
  4. With a paint brush, apply white/cream coloured paint around the edges using up and down strokes.
  5. Apply to the layout with foam dots for a raised effect.

You Are My King

May 6, 2010

Scrapbook Star's June Kit Sneak!

It looks awesome, doesn't it! Sam at Scrapbook Star puts together such wonderful kits, and this sneak of June's kit is sure to impress!


This is a project I made using April's kit. The rub-ons, letters, and flower are Pink Paislee and the patterned paper is My Mind's Eye.

Don't the rub-ons look awesome on metal?

May 4, 2010

Daddy & Sophie

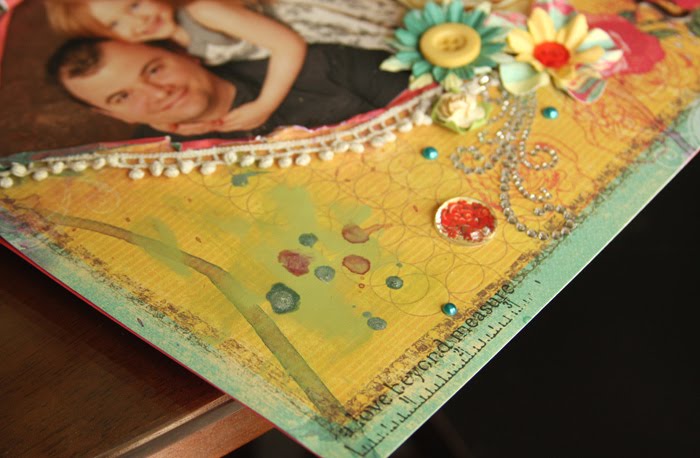
I am usually a bit modest when it comes to using flowers on my page, but this time, I let loose and almost used a whole pack of Primas. I figure when you have coordinating patterned papers with flowers that were designed to match, it would be wise to put them together and just enjoy the outcome, and what could be more beautiful than a huge splash of colourful flowers?


I recently won a Unity Stamp Scrapbooking challenge, and I just got my winning kit in the mail (Vintage Chic). You can see the measuring tape and "a love beyond measure" sentiment in the corner.
Other stamps used were 7 Gyspies (date stamp), and the quote from an Ali Edwards set from Technique Tuesday in the other corner.
Have a wonderful Tuesday!

May 1, 2010

Rita & Les...Happy National Scrapbook Day!

We are having a little National Scrapbook Day challenge session over at Scrapbook Star and the Design Team has come up with some good ones! Click here to see the challenges and to participate.

My challenge is to use what's on your desk. If you saw my desk, or should I say 3 desks shoved together, you would know that I have an abundance of products to pull from within arms reach and it is always a mess! You know what I love about doing this sort of thing? You don't waste time wondering what you can dig out, just use whatever is there and make it work (like Tim says from Project Runway). You can see I used some packaging, some My Mind's Eye paper, a Maya Road sheer clock, some random die cuts (Making Memories and K & Co.), Prima Flowers, etc...

These are my cute grandparents back in 1938. My Grandpa passed away on St. Patrick's Day last year at the ripe old age of 93, and he was Irish! It was the perfect day for him to go, as we will never forget him.


This is the prize I am offering up, just post your project to be entered at Scrapbook Star.
  • Prima Pebbles
  • Maya Road Velvet Ric Rac
  • 8.5 x 11 Sheet of Black Glitter Felt
Hope you can play along!