Dec 19, 2011

Unity December Kit of the Month


In case you need a couple of quick card ideas for a special friend, here are some ideas using Unity's December Kit of the Month, "Filled with Love".  There are so many great images to work with (see complete kit below).


Sit-Talk-Enjoy
This card was made by die cutting the image and sentiment from the DECEMBER 2011 Kit.  I used the same die template (Spellbinders S4-319 Lattice Rectangles) to cut a piece for the back, then used a thin strip of liquid glue for the top only to make "the fold".  The flower is a die template as well (Spellbinders S5-067 Anemone Flower Topper).  I used a Copic Marker for the chair and some double sided BoBunny Gabrielle paper for the flower.


Sisters by Heart
To make the bottom, I used the same die template as the first card (Spellbinders S4-319 Lattice Rectangles), only I ran it through only 1/3 of the way, then backed it out of the die cut machine.  I also wanted to frame the LOVE stamp and sentiment, so you could use any label stamp you have.  I used Spellbinders S4-290 Labels Fourteen).  I just layered some ribbons for texture, used Copic markers for color, and was missing some RED, so I used some Stickles to make my own little hearts.


Hope you all have a MERRY CHRISTMAS week!


Dec 9, 2011

Painting Mason Jars - RECYCLE with Glue Arts

This week, we are making Christmas Decor projects over on the Glue Arts blog

If you have some time, look over the past couple of weeks for really beautiful projects that you can make at home.

Here is my contribution to the Holidays week - a recycled mason jar, painted and trimed for my blue and red mantel.


Supplies:
Glue Arts Hot Glue Gun Sticks
Webster's Pages Ribbon (Blue Flowers)
Maya Road Ribbon (Blue Grosgrain)
Maya Road Decorative Pins
Trim (FabricLand)
Tim Holtz Fragments Acrylic Tag 
Staz-on (Cotton White, Jet Black)
Unity Stamp Co. (All Seasons Sep 2011 Kit of the Month)
Queen & Co. Blue Pearls
Blue Cord
Sand Paper
Battery Operated Tea Light
White Primer Paint
Shimmerz Vibez Spritz (Jeni B Bleu)
MASON Jar


See the full blog post HERE on the Glue Arts blog.


Thanks for visiting!


Nov 24, 2011

Black Friday Sales....

Shop for your Shimmerz products HERE tomorrow to take advantage of the 25% sale off of the Limited Edition Holiday Set (see in photo).  These are beautiful colors for the holidays.  Paint some ornaments, spritz some poinsettias and decorate your table with these beauties.

Reg Price: $20.00 for the set


Nov 23, 2011

Spreading the News!!! Unity Sale

Today is the last day to take advantage of the Unity sale!!!


LINK:

Happy shopping - these make great stocking stuffers, especially Itty Bitty stamps!

Nov 21, 2011

Antiqued Tin Foil Flowers with Shimmerz and Spellbinders!


One word: STUNNING.  These homemade flowers, made from tin foil are so BEAUTIFUL.  I want you to try this.  I am so excited by the result that I implore you to give this a try!  You will not be disappointed.  These are so easy and fun, and you can use any color of Shimmerz Coloringz for different effects.

I haven't been this excited about a technique in some time, and using tin foil is CHEAP CHEAP CHEAP!!!


 Shimmerz has a great selection of colors in the COLORINGZ line, so check them out in the Shimmerz Shop

Hope you enjoy!


Nov 16, 2011

Up the Street Scrapbooking - Autumn's Embrace

I have some more KIT work to share with you from Up the Street Scrapbooking!  See my previous post from this month for all my other work with these FAB kits.

(You can enlarge any of the photos to see more detail.)

These two layouts were made with Kit #1 Autumn's Embrace, and last I heard, there were only a few left!  


Bronte Creek Maple Syrup Festival
Spellbinders™ Holly Accents 
Spellbinders™ Parisian Motifs
Spellbinders™ Spiral Blossoms One
Waxed Cord
Sand Paper

In the kit, you get to play with Core'dinations NEW Kraft Core cardstock (see the red cardstock that has Kraft colorin the middle).  I am so excited by this new paper, especially with die cutting and embossing, sanding, etc.    I also loved working with the Pink Paislee embossed mistables paper you see as the background (I used Shimmerz Coloringz on it to make it orange).  The black markings look like stamps which I appreciate.


I used some Spellbinders die templates to work with the papers (see the leaf, rolled flowers from patterned paper, and the decorative strip of holly).


Today I...
Spellbinders™ Creative Book Pages
Adirondack Ink (Sunset Orange)
Waxed Cord
White Gel Pen


Check out the complete kit supplies HERE:


Have a great day.


Nov 14, 2011

Two Peas and Unity - Holiday Card Making Event

Just wanted to share what's happening at Two Peas this week with Unity.


THIS EVENT IS HAPPENING NOW  
Monday to Friday

I made a video this week to kick off the event using Bella Blvd's Christmas Wishes stamp set available at Two Peas!


These cards are super quick and simple, yet have a little bit of glitter to dress them up.  They are flat and perfect for mailing.


INTERESTING FACT:


Two Peas carries over 300 Unity Stamps!!! 


See you over there!

Nov 11, 2011

Fall is Officially Here: Glue Arts and WRMK

We were able to work with We R Memory Keepers' AUTUMN SPLENDOR paper and embellishments this week on the Glue Arts blog!

This paper is so awesome to work with, so well coordinated and embossed with glitter too!  The tags, embossed stickers, glitter brads just make it all come together so easily.


Supplies:

We R Memory Keepers Autumn Splendor (Designer Scrapbook Pad, Textured Cardstock Pad, Embossible Designs Stickers, Tags, Glitter Brads, Layered Chipboard, Brad Setter and Piercing Tool)
Spellbinders™ LF-124 Grand Scalloped Circles
Spellbinders™ Grand Calibur Die Cut Machine
Clearsnap Ink
Black Sharpie Pen


PLEASE do check out the Glue Arts Blog for all the other projects made this week with this beautiful product AUTUMN SPLENDOR.  


PSSST:
 There is an awesome giveaway over on the Glue Arts blog this week.

You could win this:
Autumn Splendor Scrapbook Pad collection filled with over 860 pieces! Paper, stickers, glittered papers, diecuts and more!

AND


a Glue Glider PRO Handle and new PRO+ cartridge!

HEAD ON OVER TO THE GLUE ARTS BLOG TO ENTER.


Have a great weekend.


Nov 9, 2011

Winner of the Spellbinders Prize Package


Thank you so much for everyone who came by the Handmade Holiday Blog Hop and left a comment.  It was so much fun to see all the different and FRUGAL ideas out there!

But right now, I am happy to announce the winner of the Spellbinders prize package that happened to leave a comment on my blog.


And here she is.... 

Trisha said...

WOW!! Your tags and gift box are gorgeous. Love your colors
and the vintage feel. 


Congratulations Trisha!

Nov 4, 2011

Handmade Holidays Blog Hop!


Welcome to the Handmade Holidays Blog Hop!!!

This stop is all about what you can do with SPELLBINDERS!


Calling all crafters! We’ve gathered designers from some of our favorite manufacturers to show you ways to create something from the heart this holiday season. This 3 day Hop includes over 60 stops with inspiration brimming from every corner. Explore all thoughtful and frugal handmade gifts you could make for the holidays, all in one place on this Hop!


To sweeten to Hop, we’re offering a gift for you! For every comment you leave on the blogs in the Hop, you’ll be entered to win a prize pack from one of the participating manufacturer sponsors!


Here is what you could win from Spellbinders™!


Visit the list of blogs below and leave a comment on each by Nov 7, 2011 at 11:59 PM PST. Each day we will be sharing a brand new list of blogs with brand new projects for you to explore, be inspired by, and create from!


November 4th, 2011 
HOP LIST


Cheers to creating gifts from the heart this holiday season!


Happy Hopping!


_________________________________________________________


HERE IS MY FRUGAL GIFT!

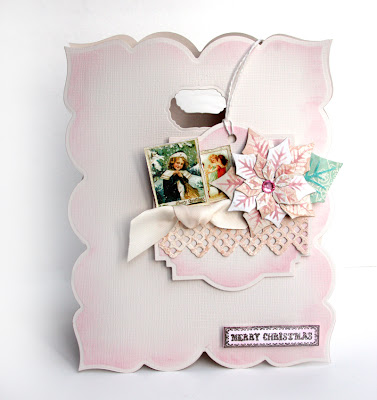
I'm glad you're here!  I was thinking long and hard about what I wanted to make for you today and with so many Spellbinders die templates at my disposal, the possibilities were endless!  I finally settled on a set of homemade gift tags, which if you omit the tools and inks, this gift can me made for under $10.00.  You can stamp To: and From: on the back, which is clean and available for a personal message, or you can write the person's name on the front, where there is white space.

This is also the type of project you can do in pieces, and in front of the TV.  Make all your die cuts, ink flowers, assembles flowers, assemble tags, etc...

Personally, I love PRACTICAL gifts, things that I can use, and these are totally gift worthy and will dress up any gift beautifully.  They can take a bit of time to make, but will get you that response you're looking for.  No one will associate this gift frugal, because they can see the heart that goes into handmade tags.

I do hope you enjoy the hop today!  Merry EARLY Christmas.


Vintage Christmas Tags


1. Die cut and emboss labels (Spellbinders S4-346 Labels Twenty-Two) from cream cardstock.  Leave paper in the die template and use as a stencil and apply Clearsnap ink (Shabby Pink) to the edges using a Clearsnap  Stylus with blending foam.


2. Die cut and emboss poinsettias pieces from patterned paper using Spellbinders S5-055 Layered Poinsettia.  Leave papers in the die templates and use as a stencil and apply Clearsnap ink (Shabby Pink to Poinsettia and Aqua to Leaf) to the embossed portions on the die cut image (apply Clearsnap ink using a Clearsnap Stylus with blending foam).


3.  Die cut and emboss Spellbinders S5-062 Lacey Doily Accents to create a lacey accent to the label.

4.  Cut out Christmas images from patterned paper and distress edges with scissors.


5.  Glue together poinsettia pieces with Glue Arts Micro Adhesive Squares, adhere gem for the center (Want2Scrap).   Bend poinsettia petals to make the flower more dimensional.


6.  Assemble tags by adhering items in this order: lacey accent strip, ribbon tied in a bow, poinsettia (with Glue Arts U-Cut-It 3D Foam), leaf, and 2 Christmas images (some with 3D Foam).  Punch hole, adhere string.


7. Add Stickles or glitter glue to the top corners of the Christmas images, let dry.


Beautiful Gift Box


1. Using the Spellbinders Grand Calibur die cut machine, cut and emboss 2 grand labels (Spellbinders LF-347 Grand Labels Twenty-Three) from cream cardstock.  Leave paper in the die template and use as a stencil and apply Clearsnap ink to the edges using a Clearsnap Stylus with blending foam.


2. Die cut a hole at the top of both labels using Spellbinders S4-190 Labels Four.

3. Cut 2 strips of cardstock (3.5 x 12) to make the sides and bottom.  Using a Scor-Pal, score lengthwise at 7 inches.  Turn to the width, and score at 1/4 inch in from each side.   Because you want the top of the box to fold in, you need to make one more score at the top of the sides.  At 1.5 inches (which is the middle), score each side 1/2 way down.


4. Make triangle cuts at the corners.  This will make the corners fold in easily.


5. The bottom will be 5 inches total, so glue the bottom pieces together, ensuring a total length of 5 inches (you can use your Scor-Pal for measuring).


6. Using your Glue Arts Glue Glider Pro+ or similar, adhere adhesive strips to the folds, glue box together, one side at a time.


7.  Fill with your homemade tags and use one of your tags to decorate the front.  Glue sides together once filled with Glue Arts Extreme Adhesive Squares.


8. Stamp Merry Christmas (Unity Stamp Co) onto white paper, ink around edges with Clearsnap ink, and adhere to box with 3D Foam.


Supplies:

Vintage Christmas Tags
Spellbinders S5-062 Lacey Doily Accents
Spellbinders Grand Calibur Die Cut Machine
Clearsnap Ink (Surf's Up ColorBox Queue, Swell ColorBox Queue)
Clearsnap Stylus
Clearsnap Blending Foam (Round Tip)
Graphic 45 Patterned Paper (Christmas Past)
Glue Arts Micro Adhesive Squares
Glue Arts U-Cut-It 3D Foam
Bazzill Cardstock
Want2Scrap Pink Gems
Stickles (Rock Candy) by Ranger
Hole Punch
Ribbon
String

Beautiful Gift Box
Spellbinders S4-190 Labels Four
Spellbinders Grand Calibur Die Cut Machine
Clearsnap Ink (Swell ColorBox Queue)
Clearsnap Stylus
Clearsnap Blending Foam (Round Tip)
Glue Arts Glue Glider Pro+
Glue Arts U-Cut-It 3D Foam
Glue Arts Extreme Adhesive Squares
Bazzill Cardstock


Thanks for stopping by.


NEXT STOP:

Daniela Dobson – Clearsnap  http://danieladobson.blogspot.com/